Building a robot with wheels or with legs needs a design completly different. One of the biggest difference is the type and number of motors.
While for a robot with wheels usually 2 or 4 servos or gear motors are enough, when we speak about a robot with legs, the number of motors increases dramatically. It is not uncommon to see a hexapod robot with 18 servos.
A quadrapod robot has usually 8 or 12 servos, depending on the number of joints. Luckily, compared to robot with wheels, usually are not required servomotors with continuous rotation or gearmotors. Standard servos (0-180 degrees) are enough.
Servomotors are driven with PWM and Arduino 2009 or Arduino Uno have 6 PWM pin. And this is a problem. And if you want to use also other sensors using digital pins, the situation is not good, because the Arduino’s digital pins are only 14, and 2 of wich are used for the serial port communication (pin 0 and 1).
It is possible to use the Arduino Mega, with 14 PWM pin, but it is very expensive (50 euros and more).
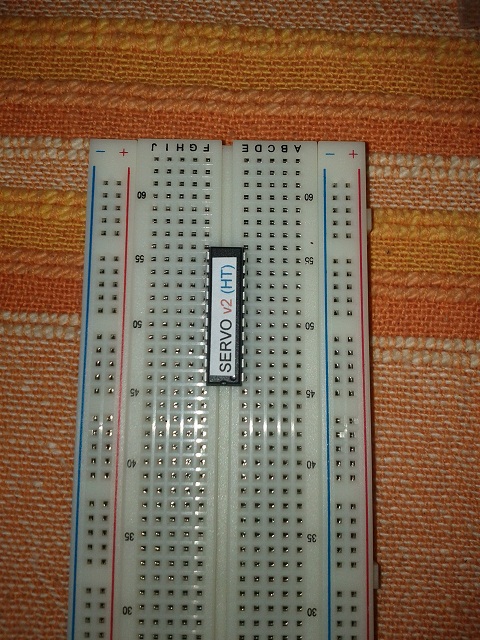
Searching in internet, I found a low cost chip, using I2C protocol that can drive 12 servos. First good news, the I2C protocol uses only the analog pins 4 and 5. Second good news is that you can use up to 8 chip, so it is possible to drive up to 8×12=96 servos with only 2 analog pins, the 4 and 5. Third good news is that the chip costs about 4 euros and half. A price that can be accepted by every robot builder.
This is the magic chip:
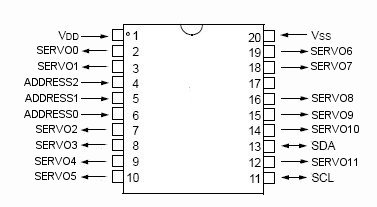
It is a DIP chip with 20 pins.The chip is made by Hobbytronics (here). This is the pins schema:
This is the pins usage:
VDD = +5 V
Vss = GND
SDA, SLC are pins I2C that are connected to Arduino’s pins 4 and 5 and also connected to the Arduino +5 V using the pull-up resistors. The value is between 1K and 10K Ohm (I used the 3.3k Ohm).
Address1, 2, 3 are the pins that you can use to change the I2C address of the chip(usually not needed, unless you uses more than one chip, in this case it is necessary to differentiate the addresses).
SERVO01 … SERVO11 are pins connected to the control pin of the servos (the others are connected to +5 V and GND).
I did a test and I think it works fine.
Here is a short video I made:
This is the datasheet.
This is the code used in the video.
Below my code:
// I2C servo controller by www.hobbytronics.co.uk
// written by Alegiaco - July 2011

#include <Wire.h>

const int  servoslave_address=40;   // I2C Address of ADC Chip
int gradServo[12];

void setup()
{

servo12Setup();

}

void loop()
{
moveServo(5,0); // move servo 5 to 0 degrees
delay(1000);
moveServo(5,90); //move servo 5 to 90 degrees
delay(1000);
moveServo(5,180);  //move servo 5 to 180 degrees
delay(1000);

// move servo 4 and 5 to 100 degrees
gradServo[4]=100;
gradServo[5]=100;
moveServoSet(4,5,gradServo);
delay(1000);

// move servo 4 and 5 to 180 degrees
gradServo[4]=180;
gradServo[5]=180;
moveServoSet(4,5,gradServo);

delay(1000);
}

void servo12Setup(){
 Wire.begin();              // join i2c bus (address optional for master)
  // Optionally set mode to standard
  // – comment out this section if extended mode required
  Wire.beginTransmission(servoslave_address); // transmit to device
  Wire.send(20);             // servo register address 20
  Wire.send(1);              // 1 = extended mode (0-180 degrees)
  Wire.endTransmission();    // stop transmitting
  delay(1);
}

void moveServo(int numServo, int deg) {
    Wire.beginTransmission(servoslave_address); // transmit to device
    Wire.send(numServo);               // servo register to start from
    Serial.println(numServo);
    float degre=((deg/180.0)*255.0);    // transform in format compatible with servo controller
    int degree=int(degre);
    Wire.send(degree);           // send 12 bytes of data
    Wire.endTransmission();    // stop transmitting
    delay(1);                  // waits
  }

void moveServoSet(int numServoStart, int numServoEnd, int valServo[12]) {
    Wire.beginTransmission(servoslave_address); // transmit to device
    Wire.send(numServoStart);               // servo register to start from
    for (int j=numServoStart;j<=numServoEnd;j++) {
      float degre=valServo[j]/180.0*255.0;
      int degree=int(degre);
      Wire.send(degree);           // send 12 bytes of data
      }
    Wire.endTransmission();    // stop transmitting
    delay(1);                  // waits

    }

